Contrast enhancement – part 1/2
In the previous image processing posts, we built a luma histogram from a RGB picture.
In the next posts, we will work on contrast enhancement. We will use the luma channel, and define 2 luma stretch points, one on the dark side, one on the bright side. So all the pixels having a luma value below the dark luma stretch point will become black. and all pixels having a luma value above the bright stretch point will become white. In between, it will be stretched linearly.
These points will be determined dynamically, thanks to histogram analysis. We will define threshold in percentage of pixels. For example we could want 1% of all pixels to be black after contrast enhancement. Such a stretch will modify the picture so that a small percentage of pixels will be black and white. It will improve washed out pictures, what is very common if you have lens flare for example.
So part one : determining the stretch points by histogram analysis.
Based on our previous example, histogram was created by analysis all the pixels in the luma channel. As our luma channel is done on 8bits (0 to 255), our histogram has 256 bins. I did it like this :
int[] get_hist(int[] input_array) {
// Create one array to store the histogram
int[] histogram = new int[256];// Loop through every entry in the array, update histogram.
for (int x = 0; x < input_array.length; x++) {
histogram[input_array[x]] +=1; //increase the bin count of the selected bin by 1.
}
return histogram;
}
As you can see, I created a generic histogram function. Only limitation is that it has only 256 bins, and assume input array to use 8bits only. I may improve this later.
Then, we need to detect the luma stretch points, so that the sum of the pixels contained in the selected histogram bins will match our % target.
We define our target in %:
float black_percent = 0.5;
float white_percent = 0.5;
Then, it has to be translated in pixels :
int nb_pix_target_white = (int)(nb_pix_total*white_percent/100);
int nb_pix_target_black = (int)(nb_pix_total*black_percent/100);
We go through the hist bins, and find the luma stretch point :
//Find black_Y_bin
int black_Y_bin = 0;
int sum_pix = 0;
int i = 0;
while (sum_pix < nb_pix_target_black) {
sum_pix = sum_pix + hist[i];
i++;
}
black_Y_bin = i;
Then, we do the same thing for the bright side. We now have the black and white thresholds. We will have to modify the luma channel to stretch it using these points.
We will do it next time, today we will just stretch the histogram, trying to see what will be the effect after stretch.
If we stretch the luma channel and then make an histogram, it should give the same results.
This is how I did it :
int[] stretch_hist(int[] hist, int black_stretch_pt, int white_stretch_pt) {
// Create new array to store the stretched hist
int[] new_hist = new int[256];
float j;for (int i = 0; i < 256; i++) {
if (i <= black_stretch_pt) {
new_hist[0] += hist[i];
}
else if (i >= white_stretch_pt) {
new_hist[255] += hist[i];
}
else {
j = (float)(i-black_stretch_pt) / (float)(white_stretch_pt-black_stretch_pt) * 255;
new_hist[round(j)]+=hist[i];
}
}
return new_hist;
}
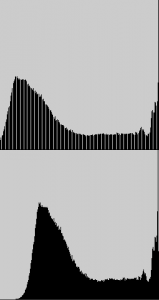
When the stretched histogram is displayed next to the original, we can see that the stretch is working, as now we have some black pixel. So contrast is expected to be improved when same stretch will be applied to the luma channel.
One interesting thing to note is that there are some gaps in the histogram. This is expected, and one way to improve this would be to add a small amount of randomness when the stretch is done. Otherwise, and if the stretch is very strong, we would probably see some contouring appearing in some low frequency gradients, like blue skies gradient for example.

Check the working example implemented in Processing.js here. Source code is available here as well. All the Image Processing functions are now included in a file called isp.pde. It is merged to the main when I do the javascript export in the processing IDE. But you can get it from this location.
Next steps : applying the stretch on luma channel, and merging back Y’CbCr to RGB to see the effect on the picture.
Your comments are welcome !
One Comment
Comments are closed.